- Firstly, you'll need to open Windows 10 Mail by clicking on the Start button, then clicking on 'Mail'.

- Once Windows 10 Mail has opened, choose the 'Settings' icon (the cog) from the menu located at the bottom of the app.

- Then simple choose 'Manage Accounts' from the settings menu that appears on the right hand side of the screen.

- Then click on the option labeled 'Add Account'.

- After you have entered your e-mail address and password, choose 'Advanced setup' from the list of different account types.

- Then choose 'Internet email' to set up your account details.

-
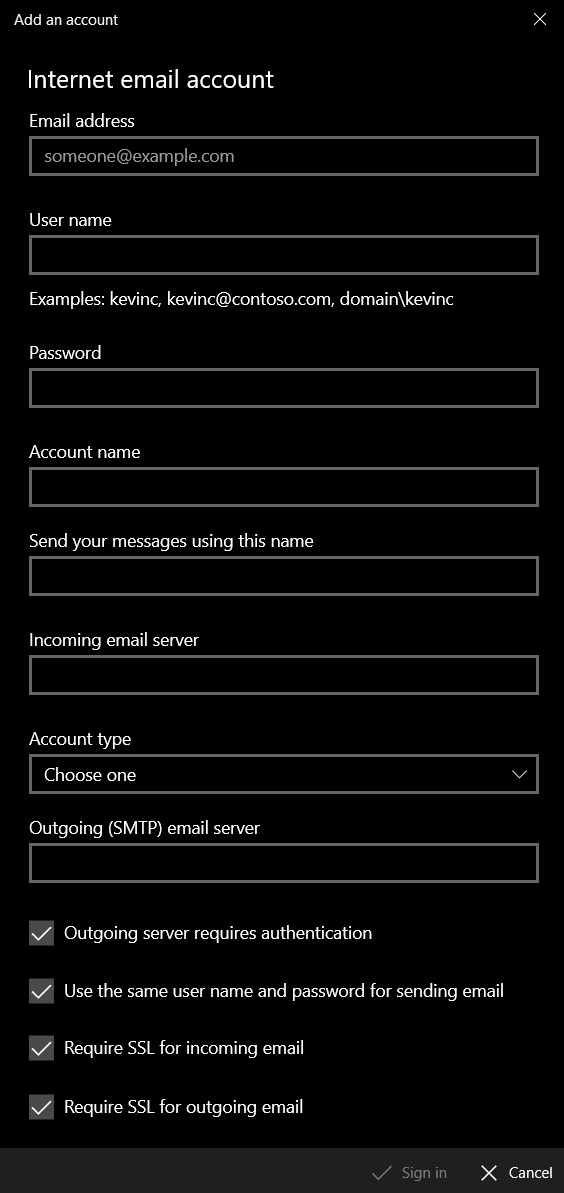
You will be presented with some new form fields to fill in.
Firstly, enter your e-mail address in the field labeled 'Email address' and 'User name'.
Next, enter your password of the email in the field labeled 'Password'.
In the field labeled 'Account name' please enter your name.
Enter your name that use to send email in the field labeled 'Send your messages using this name'.
For 'Incoming email server' & 'Outgoing email server' please enter 'mail.yourdomain.com'.
* If you not sure where to get your mail server, kindly refer to this article 'Where to get my mail server'Then choose your protocol via the 'Account type' dropdown menu.
*POP3 will download all the emails to your PC and will auto-delete the email inside the server.
*IMAP will sync all the emails inside the server to your PC, all the server emails will show on your PC.Ensure the 4 checkboxes at the end of the form are all checked.
When you have entered the relevant details, click 'Sign-in' to proceed to the next stage.

- If you have entered your account details correctly, you'll see a message reading 'All done! - Your account is setup'. Simply click the button labelled 'Done' to complete the setup process. You are now ready to send and receive email using Windows 10 Mail.
- 0 Users Found This Useful

